Warning: this is an incredibly long post, but there's a ton to cover. If you're interested, all the product links are at the very bottom of the page with the price breakdown. No princesses were harmed in the making of this blog post.
Who can guess what these two things have in common?
Give up?
Well, how about this:
Remember when we changed the locks last weekend? We must have been tempting fate by spending money on something home-related that wasn't absolutely necessary. As in, we could have lived with annoying locks for a while longer if we knew we were about to spend $$$ on a new door.
Last Thursday Mr. Great Indoors was weed-eating next to the back patio when a piece of pea gravel shot up and hit our sliding glass door. Keep in mind that I've hated this pea gravel since the moment we moved here and we have often discussed plans to put in nice, thick pavers in place of our awkward little walkway (think pea gravel with a few round stepping stones like these leading around the side of our house. At least the holly bushes are under control now). I suppose the pea gravel must have had it out for us, too, because it made an instant crack in the exterior pane of the stationary side on our sliding glass door, and then proceeded to crack into a million little pieces for the next few hours. It is awe-inspiring, is it not?
Thankfully, the cracked glass stuck together for a few hours until Mr. GI opened our side door and a piece fell out... then another and another... until we had a little fun knocking all of that junk off.
It was really beautiful down there on the ground (I hummed "Diamonds are a Girl's Best Friend" for most of the night), so my mom suggested we corral all the clean stuff together in a vase, hence the top picture above. And I couldn't get a good picture of it, but the next morning the light shone off the broken glass and shimmered on our dining room ceiling. It really was a beautiful accident. But still not cheap.
Thankfully, the rock only shattered the exterior pane of glass on the non-moving part on our sliding door, so we didn't have to come up with a temporary solution or rush out and grab a door that night. So we did a little research at Lowe's and Home Depot (and Craigslist, but nothing much there), looking at both sliding glass and French doors. When we first moved into the house, I was 100% sure that we would switch to French doors as soon as we could afford it. But after living in the space for two years, I was torn about what to do. We weighed the options (like the fact that sliding glass doors took up less floor space, and that French doors would allow us to move big stuff in/out of the house without any issue) and ultimately decided on French doors. There wasn't a ton of price difference (about $40), but it really was the practicality of being able to throw open both doors that did it for us, coupled with the fact that the sliding glass doors in our price range were UGLY. I was a little worried about furniture placement for dinners at our house (since two sides of the table are doors and the other two sides are walkways to said doors), but we'll figure that out when the time comes. And Home Depot ended up having prettier options for about the same price (the second time in less than a week), so we made the trek across town to grab one of theirs.
So here's how we did it.
1. Grab a good friend with a truck and transport the door nervously and veeerrrryyyy caaaarrreeefulllly for eleven miles. Arrive, thanking your lucky stars, with door intact.
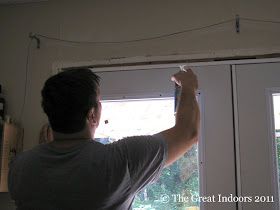
2. Demolition time! Remove all trim inside and outside surrounding current door. This is the fun part, especially when you're using a Wonder Bar (get it? wunderbar....?).
We've definitely got some repair ahead of us when we paint the dining/living room combo. We weren't sure if this peeling stuff was wallpaper or just several layers of paint stuck to the old trim. Either way, gross.
3. Unscrew the door and frame, then remove them!
4. Play mime in the empty door hole. This is a required step.
5. Square and (re)secure framing.
This picture reminds me that I forgot one stop on our house tour-- the homemade bike rack!
6. Take a break that may or may not involve adult beverages. It's all about morale, folks. And give the dog something to keep him occupied. Chewy's well-trained enough that he never tried to dart outside during the project, but it was still nice not to have him underfoot.
7. Caaarreeeffullllyyy remove the door from your trailer and move it to your door hole.
8. Level everything up and screw the door into the framing.
That's our internet cable draped above the door; our solution for having a phone jack on one side of the door and power outlet on the other side. We usually keep it hidden behind the curtain rod. :-)
9. Install door handles.
We opted for a lever-style door knob (just a hall/closet knob without a lock) to make it easy when going back and forth with full plates of food from the grill. Then we got a deadbolt to match what we just bought (grr), which Home Depot matched to our current keys at no extra cost. It's really nice now to have three exterior doors all keyed the same way, since our sliding glass door exterior key was long gone and we could only lock it from inside. Hooray!
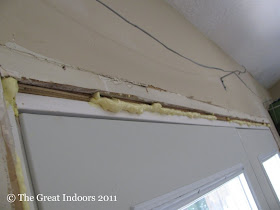
10. Caulk and insulate.
We used Great Stuff to insulate around the door. It turns out the window/door type is a lot easier to work with than the exterior Great Stuff. We accidentally used too much at first, but it was really simple to razor off the extra and peel it back.
11. Ponder trim.
I swear I didn't stage this photo. We were reusing the old trim (thankfully!) but needed to work around the new hinges. So Mr. GI decided to put wood between the wall and the trim to give the hinges enough clearance.
12. Install/reinstall exterior and interior trim.
13. Paint trim.
I'm not actually left-handed, but I forgot to take a picture on the other side of the trim. Oops. :-) My real life-saver in this job was my paid-a-few-bucks-for-it-in-high-school paint brush. It was super easy to paint that new trim right next to the door. Two coats and done!
14. Enjoy your new door! And don't forget to thank your help with lunch. :-)
Disclaimer: I took these pictures before the trim was painted (so you can definitely see the trim on the left and right sides that is fresh wood), and we hadn't rehung the curtains. Houses are ever-evolving never-finished creations, so why shouldn't the posts about them be? ;-)
We've gotten used to our new door (reached the wrong way for the door handle a few times), but poor Chewy hasn't caught on so quickly. Hopefully he'll figure it out soon enough. And we'll have to come up with a solution for our interior door mat; originally it was directly inside the inside-swinging door, but that doesn't leave enough room to wipe your feet. So I'm thinking about doing something like this to stitch together a few cheap-o door mats from IKEA. I also haven't decided on painting the doors themselves. They came primed, but I'm kind of okay with keeping them as is for a little while.
From start to finish, this project only took about four hours (plus another few hours of driving around to compare prices, actually pick up the door, and go back for more materials). Here's the moolah breakdown:
- Masonite French door: $372.36 (minus $53 because Home Depot didn't reserve us the right door so we ended up with a door that had some minor dings and defects. I wish I could have seen my hubby fight that one tooth and nail.)
- New Kwikset door knob and Defiant deadbolt: $39.53
- Trim materials: $33.84
- Paint and supplies: $22.41 (exterior) and on hand (interior)
- We lost a receipt at some point, but it just had little stuff like caulk and our Wonder Bar.
- Total: $415.14
An unexpected project, that's for sure, but Mr. GI says it's the easiest one to date in this house, and it certainly updates the house significantly. Any one else have a fun story about surprise home improvements? Or pea gravel?


New door(s) look nice!
ReplyDeleteAmazing! The new doors look great!
ReplyDeleteI love the new door :) glad it made it across town in one piece! I like that it's white- it looks really good with your kitchen cabinets!
ReplyDeleteThanks, all! We're really happy it turned out well. :-)
ReplyDelete