Mr. Great Indoors built us a wine rack within a month of moving into the house. He didn't have a lot of tools at that point, so he didn't build it to be very complicated. Here's a picture of the old rack from the day of our housewarming party a few years ago. Boy, don't things look different! Unpainted cabinets, old sliding glass door, old dishwasher... we don't really miss any of those things these days.
It was pretty basic-- just an angled top shelf without dividers and a bottom shelf with three horizontal slats. The tough part with the wine bottle shelf on top was that if you picked up one of the bottles, the remainder had the very real potential to go sliding. We also had no place to store our accessories, and any time one of us wanted to open a bottle it either had to be done in the kitchen (which was already very busy when we had friends over) or on the kitchen table (which can also be pretty busy!).
I don't think Mr. GI was happy with it to start, but we certainly used the heck out of it regardless. Eventually, though, the carpenter got the best of him and he decided to build another rack using parts of the old one plus other extra wood we had around the shed. The trim on the front edges was left over from our kitchen cabinetry reno, spare plywood made the top and bottom shelves, extra slats from our corn hole boards, and the black pieces are from our old wine rack.
I used paint we had on hand, including Olympic interior semi-gloss white (no VOC), Kilz2 latex primer, and a Whizz Green 2" angled paintbrush.
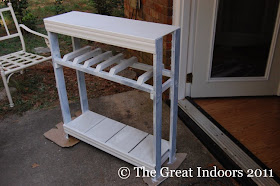
I sanded down the wooden parts (the trim is foam-- we can safely never recommend anyone use this to save money on a project. It's awful to work with) and slapped on a coat of primer. Here it is after the primer coat.
One of the bottle supports wasn't quite nailed down completely (you can see it missing in the picture above), so I had to paint it separately.
Then I gave 'er a few good coats of paint. I put the feet of the rack on cardboard so I could paint them completely without getting gross.
After allowing the paint plenty of time to dry, Mr. GI applied a thin coat of poly to make the paint job stand up to the daily use it'll be getting. Because let's face it, folks: we'll certainly be putting this sucker to good use.
That $8 bottle of spray poly was the only moolah we spent on this rack, which is why it's a (basically) free project. Check it out in all its glory. I keep all our large board games in the silver bucket on the bottom shelf.
Forgive the slightly fuzzy picture, but I wanted to show you what's inside the basket on top. We're using it to keep our shaker, wine opener, extra coasters, and funky glass markers (thanks, Mom-- they're super handy!).
And we also now have a place to hide our wireless router and modem, plus all those crazy cords. Prior to this solution, the router and modem were sort of stuck behind/between the board games, with the cords haphazardly arranged behind the bucket. Now they're completely hidden unless you're sitting in the right place in the living room and can see their lights flashing.
After about a month of using it, we're really loving this solution. It's so nice to have a flat place to uncork wine bottles and store some extra things. And have I mentioned how much I love my thrifty, handy husband? I love that he can make something out of nothing. Of course we stuck to our he-builds-it-I-paint-it agreement.
Anybody else out there who spent less than $10 on something you use every day? And we're not counting the wine itself in that count, of course.
P.S. What do you think about the new, bigger picture sizes?


Love the bigger photos. And what a great wine rack! My fav feature is how you can hide your wireless router. I hate those things, so ugly and 100' of cord when you only needed 3'.. Handy men are the best! Way to go to your Mr.!
ReplyDeleteThanks for reading, Helen! I agree that handy husbands are good to have around. :-)
Delete