
So for Christmas, Mr. Great Indoors built me my very own beautiful table. Of course, I took plenty of pictures through the process and thought I'd share them in two separate posts: one dedicated to the building of our beautiful table and one just for all the tasty pictures. Mmmmm.
I'm choosing not to call this one a "do it yourself" project because we had specialized furniture equipment at our disposal. Mr. GI's family owns a furniture store, and they also have a shop full of equipment for manufacturing their own pieces. They were kind enough to let us use their lumber and tools for a few days. You could certainly do a good portion with your own sander, table saw, etc., but it would probably take longer than the three days Mr. GI took to build ours.
Step 1: Get inspired
We started by making sure sure we could actually fit a decently-sized table in our dining room. A few months ago, I cleared everything out and taped down the dimensions of a table. We double-checked that both doors, side and back, would open with a 6' rectangular table (it looks a little tight in this picture, but the actual table leaves plenty of room for door opening). A normal 6' table is 2.5' wide (like the first three pictures), but we extended it to 3' and liked that better. I've got have room for my centerpieces! And don't you love my plastic plate placeholders?

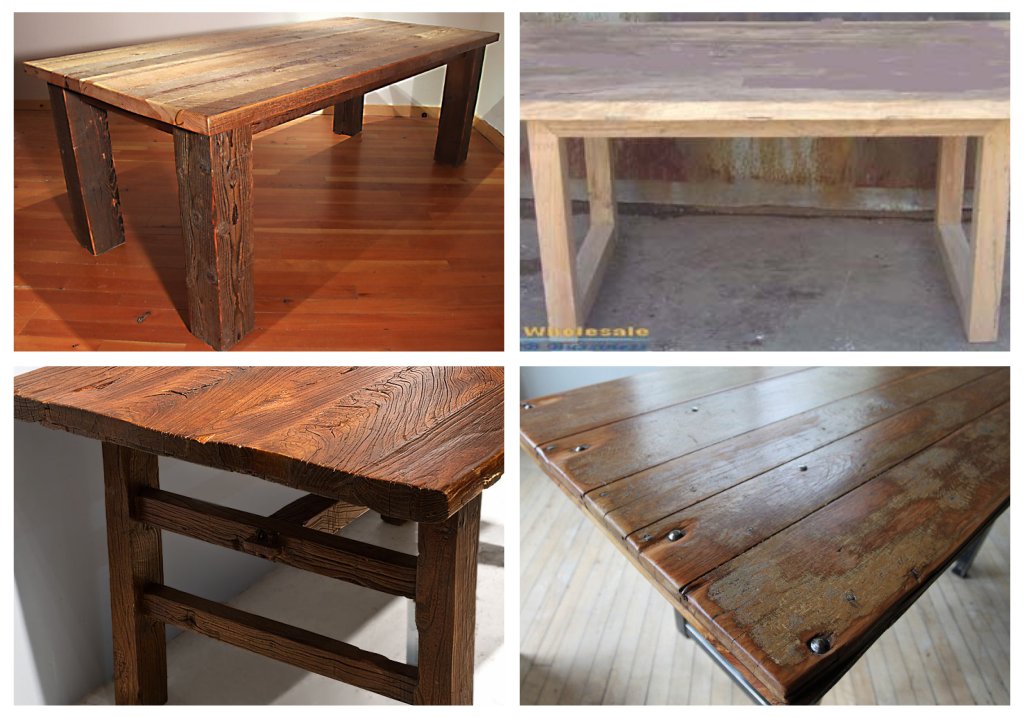
Given our dimensions, Mr. GI looked around online to find some tables he loved (from top left, clockwise: 1, 2, 3, 4). We talked through a lot of options, including horizontal planks joining the legs on the bottom (like in image #2) or antique nails for interest (image #3). But we eventually settled on a simple design like image #1. Love.
Step 2: Choose your lumber
Our planks were reclaimed barn lumber from a barn built in the early 20th century, 1917 if our information was right. Mr. GI remembers the barn itself, since it was located less than a mile from his grandparent's house in North Georgia. His uncle was sweet enough to donate a few pieces of it to our cause. We were going for character, and this wood had plenty of it. Just check out those holes and grooves.

Step 3: Assemble your table top
Mr. GI arranged the lumber in the order he thought best (noting the order with numbers on the wood), then used a planer/jointer to level out the bottom of the planks and the sides where they met. Remember that when working with power tools you should have eye protection!


Now comes the fun part-- joining the planks together. Using a joiner, Mr. GI cut evenly spaced holes in the center of each plank. Each hole is curved in, perfectly fitting a football-shaped biscuit. Since this was meant to join planks together, he didn't cut the two exterior sides.

Quality furniture builders rely on wood glue to hold pieces together, surprisingly much more than nails or staples. Much of the furniture Mr. GI's family sells at their store is Amish-made, so we used a type of Amish glue called Dutch Bond (since the Amish don't use the internet, I don't have a source for you... but you'll love this). Basically, when in doubt? Glue. For the first plank, put glue on the biscuit and press it in. For the second plank, spread glue along the entire side. Then press them together.


In the furniture world, clamps are your friend. So Mr. GI used a ton of them to join the tabletop together.

Step 4: Assemble your table legs
Mr. GI had actually decided to make the table legs from 4x4s, but didn't have any at his disposal. So he used a 2ishx5ish plank instead and joined two pieces together to make a roughly square leg. These things weigh at least 20 pounds each. It was a pretty similar process: glue, glue, glue, clamp, clamp, clamp.

Step 5: Sanding!
I didn't get any pictures of Mr. GI lovingly sanding the tabletop, but here it is after he worked on it for a bit. He used a Dremel to sand down some of the holes. There are a few of the holes that you can see through completely, and my favorite is the one you can slip a piece of ribbon down, up, and tie at the top. :-)

We even got to eat our first meal at the table when I brought him lunch! There's a good shot of the rest of the furniture shop, too.

Let's take a quick look around the shop, shall we?
I forgot to take a picture of Mr. GI using this, but it's an entire machine devoted to pocket holes (the staple gun was a separate tool, so ignore that).

Stacks of lumber, just waiting to be turned into a side table, bed frame, chair, whatever you can imagine.

The makings of a custom drawer set. Mr. GI's uncle stained these pieces during the first day of our table building.

The view out the back door of the shop. Hey, cows!

After lunch, Mr. GI was even nice enough to let me sand the legs. By the way, I've fallen in love with this pneumatic orbital sander. Mr. GI's family shop recently installed a dust collection system, so we didn't have to worry about dust as much, but I still wore a mask anyway. I would have sneezed for days otherwise.

Step 6: Build the table apron
A table apron attaches the legs to the table top. Mr. GI used a different kind of planer here. It's a tough machine that can eat up our tough lumber. Stick it through one side, walk around and grab a nicely smooth, finished, plank! Mr. GI planed the inside of each plank so the apron would be smooth and easy to work with.

He made sets of pocket holes around the inside of the apron to attach it to the table top. Here, the legs are set up for reference.

Mr. GI made four corner braces that had pocket holes in both sides (to meet the apron) and drilled two holes in the center to mount screws for the legs (that way, when we need to move the table, we can just unattach the legs). Once the corner braces were in place, he hand-planed the brace so it would sit even with the apron.

Step 7: Build a bench
We planned to use the four chairs in our old dining room set up, but this table would at least hold eight. So Mr. GI built a bench that could seat three. He cut the lumber to size, sanded it, and cut pocket holes in the legs (it looks like he planned that crack on one leg, huh?). Then two corner braces and one cross piece to keep it all stable. Before screwing in each piece, he put a bit of wood glue down first for extra security. He sanded down some of the rougher edges with the palm sander and a Dremel.

Step 8: Stain
This was my favorite step by far because it brought out all the character we were hoping for. The stain Mr. GI used was Minwax Early American. He applied it with gloves and a clean, lint-free cloth in a well-ventilated area.


And here are the final products in the shop! Stay tuned for more sexy pictures of the table in our dining room.


So awesome!I especially love the painter's tape on the floor with the plates. Priceless Mrs.-GI- Ingenuity. Your table looks fabulous, great work you two! :)
ReplyDeleteWell, I can't claim too much credit for the painter's tape (that's Young House Love all the way), but I have to agree with you that the table looks awesome!
DeleteNice!! I really like the dark stain. Looks awesome! Doug is so handy :)
ReplyDeletePS: hey cows!
Thanks! I agree. :-)
DeleteI'm very proud of both of you guys. We all love you
ReplyDeleteThat's beautiful! Nice work!
ReplyDeleteThis table is truly a work of art. Such a beautiful piece to have in your home!
ReplyDeleteI just found your blog - what a gorgeous table! I love it. It's so special to have something handmade by your husband - beautiful!
ReplyDeleteMy fiancé and a buddy are getting ready to build some barn tables for our up and coming wedding, May 2015, and have NO carpentry experience so this is going to be extremely helpful. I stumbled across your page via Google and I must say that it is amazing. I hope you and your hubby keep up the awesome work because I look forward to following your blog. Thank you!
ReplyDeleteThanks so much, Denise!
DeleteHey guys, great work on the table. Sturdy and sustainable, a lovely combination.
ReplyDeleteI was wondering if I could get your perspective on pockets screws and if you have suffered any warping of the tabletop due to wood movement. Just curious as you seem to use them extensively here.
Thanks again for the post and inspiration.
Lee
Thanks, Lee! Nope, we haven't noticed any warping (since the wood was ~100 years old and had been dried prior to building).
Deleteawesome work! The table is gorgeous. was wondering how the two bolts were put into the legs? Thanks for the inspiration. want to try do build something like this
ReplyDeleteInspirational!
ReplyDeleteLove, love this table. I have been wanting to create a table like this for a long time, so I am glad to have stumbled onto your page. We are not carpenters by any means, and definitely do not have all of that fancy equipment. Is this a project that can be made using the basic tools that an average person may have? What did you use for polyurethane on the top of the table? I am assuming you didn't just leave it stained. You needed to protect it from the wear and tear of daily eating.
ReplyDeleteI especially like the staining asd it brings out the rough character of your table. Also great you could find a use for your scraps - beats throwing them in a bonfire!! Thank you for inspiring us :)
ReplyDelete