
Really, I've had the idea for much longer than just the few months. I first read the tutorial on Little Green Notebook in 2009, which uses a set of miniblinds to hold the Roman blind fabric. Her original tutorial used the slats from the blinds, but the revised version uses plastic drapery rings instead. Although her tutorial was good, I had a few questions when working on it, so I thought my post could serve as an explanatory addendum. Her post was actually pre-Pinterest (there was a time this was true??), but I've since pinned a few images that pin-spired me to complete this project: this one and this one.
First off, LGN's blinds were made of linen, while I chose a large-patterned outdoor fabric. Since I was using a large pattern, I made sure to line it up when planning my blind. I was lucky that the pattern repeated every 23" or so, which is how wide my blind needed to be. (This is the fabric wrong side up, by the way.) I cut 26" wide and 42" long for my 23"x38" opening.

After cutting, my next step was to sew it up (which you could definitely do with hem tape; I prefer my sewing machine!). My tip here is to be sure your iron isn't set too hot. I accidentally shrunk my fabric a bit on one side because I had the iron setting too high. When it came to cutting the ladder cords, I got additional guidance from Simply Mrs. Edwards, especially this photo. Welcome to Heardmont helped me decide how I wanted to attach the fabric to the top of the blind with this photo. I ended up not using velcro, but I have some if I change my mind.
Here's how I glued my wood slat to the bottom of the blind. I opted to glue it on three sides, partially because of the ironing oopsie I had earlier (I could hide it better by wrapping it around the slat). Also, who wants to go get a manicure with me? Ugh.

And a close up of the eyebolt screwed into the wood slat. (I feel like Cassie is going to TWSS me any time now.)

I'm so glad I went back for this fabric. That's right-- I fawned over it in the store, knew it was exactly what I wanted, put it back, walked away, then changed my mind later. Luckily it was still on sale when I returned!

Folded goodness. I did have to help it up, but I'm hoping after a few weeks the fabric will get the hang of its new life as a Roman blind.
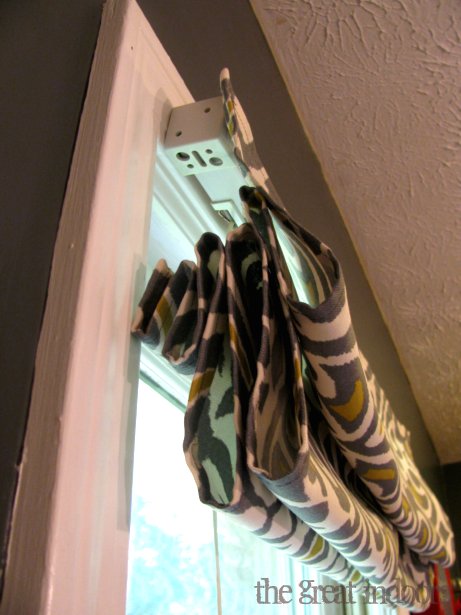
Here's a look at how I accounted for the blind's attachment points. I used fabric glue up to where the connectors would go, which gave me enough space to slide those suckers in when the blind was ready to be installed. The fabric is thick enough that it lays straight across the header without an issue. The folks who installed the blinds put it on the top of the window molding, and although most blinds are mounted inside the window frame, I'm too lazy to move it.

The fabric is especially lovely against our greenish-grayish-blueish walls.


I thought about making a shower curtain (probably from a bed sheet), but I'd like to live with this for a while just to see. Until Mr. GI guilt trips me again, that is.

Here's the view from outside, which would be interrupted by miniblind slats if I'd gone with LGN's original tutorial.

And the lovelies that bloomed just below our bedroom window last week. They remind me of the shade pattern. Maybe I'm just that in love with it.

As far as a cost breakdown, the project totaled about $20. The fabric was $13 (I got 1.3 yards), plus the fabric glue and plastic drapery rings. I used a JoAnn's 40% coupon, and the fabric was already 50% off.
Linking up to the Pinterest Challenge at Young House Love, Bower Power, Sparkle Meets Pop, and Red Bird Blue.

Wow! Great work, gal!
ReplyDeleteThanks! You'll see it in person pretty soon!
DeleteErin
Looks great! I really need to do something like this in my kitchen.
ReplyDeleteThanks! Can't wait to see how you do it-- I always admire your crafts!
DeleteErin
How much fabric did you buy?
ReplyDeleteI bought 1.3 yards, which was a bit more than I needed (I cut 26" wide and 42" long for my 23"x38" opening). Hope that helps!
DeleteErin
If you use glue, how do you wash the fabric later?
ReplyDeleteSince it has a wooden piece at the bottom, I'm actually not planning to wash the entire shade (just spot wash). I used Elmer's fabric glue (http://www.elmers.com/product/detail/E431), and their site mentions that the fabric is washable after using fabric glue. I assume that's the same with all fabric glues, but certainly check the label on your glue to be sure. Have fun!
DeleteErin
Pretty!!!
ReplyDeleteWhen choosing fabric for roman shades, the most important thing to put to mind is the mass. To achieve the perfect pleats, it should be lightweight, but not cheap-looking. Your pick was a good one, by the way!
ReplyDeleteLove the fabric!! Super cute!!
ReplyDeleteYou rock!!
Have a blessed and wonderful day!!
Where did you find the fabric!? I love it and it would go great in my gray kitchen!
ReplyDeleteI found it at Jo-Ann's (check out the link in the first paragraph), but I think it's sold out on their website. You might also try Online Fabric Store: http://www.onlinefabricstore.net/robert-allen-fabric/robert-allen-at-home-new-damask-greystone-fabric-.htm. Let me know if you make it for your kitchen!
DeleteErin
Your Roman Blinds look beautiful. Great fabric choice and it sounds like you got a bit of a bargain with the fabric being on offer and a discount code!
ReplyDeleteLovely... i love the design of the fabric.. and very informative tutorial. we can use it in our service
ReplyDeleteI love this idea for my new apartment- we have huge windows in the living room and bedroom, which is great anytime except around 7:30am on Saturday morning when I'm aching to sleep in. That being said, do you think that I could make this work if I wanted them to be blackout blinds so no light could get in? I know you mentioned the importance of getting the right kind of fabric in terms of weight and flexibility and all that, so I guess I'm wondering just how thick I can go with my fabric to where it still looks good and gets the job done. Thanks for any advice!
ReplyDeleteI haven't worked with blackout fabric before, but I don't think this would be an issue. If you work with a thicker fabric, just be sure you have the right sewing machine needle (nothing is worse than broken needles!). Hope that helps!
Delete