

Showing posts with label how tos. Show all posts
Showing posts with label how tos. Show all posts
Monday, May 13, 2013
Spring 2013 Pinterest Challenge: DIY Roman Shade
Since we finished the master bathroom about six months ago, I've been wanting to replace our crap-ola miniblinds with a Roman shade. The trouble is that I could never make up my mind on a fabric. Mr. GI finally guilted me into finishing it, so I looked in earnest last weekend for the perfect fabric -- and I found it on sale at JoAnn's: Robert Allen's Baja Damask Greystone. It was marked down to $10/yard (originally $20/yard), and I'm glad I swiped it up because it's no longer available online. (They also have a beautiful blue version of the same pattern). To spoil the ending, here is the finished product in our bathroom.


Saturday, March 23, 2013
A Bifold Door Headboard

Monday, January 21, 2013
Bathroom Humor {DIY Wooden Sign}
I'd been brainstorming on something to make for the space on our master bathroom wall just above the toilet. I wasn't quite sure what I wanted to do until I saw this photo on Young House Love with a long, skinny canvas. Then I got to thinking that something long and skinny would suit that space just fine. Read on for how I made it.

Saturday, September 1, 2012
Another Guest Bathroom: Guest Amenities
I hope you all enjoyed the reveal of E's guest bathroom earlier in the week! It's just in the nick of time, too, because UGA football season (starting today!!) brings all sorts of guests to E's house. She pretty much has a revolving door every fall (we also run our own bed and breakfast during football season). :-) With that in mind, we worked some guest amenities into E's guest bathroom.


Psst... in case you're curious, the font I used is "Channel" on PicMonkey.
Friday, April 27, 2012
Guest Bathroom: Lay It On Me
It felt like things were snowballing this week in the bathroom-- after getting the room cleaned up and painted, I knew it wouldn't take much longer to do everything else. And actually, everything in this post took about thirty minutes to do. Mr. Great Indoors really wanted this one done.
You might remember we were going with this 12x12 vinyl tile from Lowe's. We bought one tile of this gray slate and another of the beige slate to try it out, and the gray one looked great against the existing fixtures. And I loved the dimension of it. It looks deceptively like ceramic tile

You might remember we were going with this 12x12 vinyl tile from Lowe's. We bought one tile of this gray slate and another of the beige slate to try it out, and the gray one looked great against the existing fixtures. And I loved the dimension of it. It looks deceptively like ceramic tile

Image here
Wednesday, April 25, 2012
Guest Bathroom: Cleanin' Up and Wallpaperin' Down
First off, the cleaning up part of the title. During the almost three weeks that Mr. Great Indoors spent working on the drywall in the guest bathroom, our entire house was covered in a thin film of construction dust. I did try to keep things generally dusted, but all it took was one minor sanding session on the drywall patches and it all came back. I felt like Pig Pen most of the time, and with all the construction equipment scattered around, the house also looked like him.

Image here
Monday, April 16, 2012
Guest Bathroom: A Rip Roaring Good Time
You might remember that I dreaded this bathroom remodel from the minute we found out there was painted-over wallpaper we'd have to remove. I knew it would take time and tedium to remove said wallpaper, especially if the lovely builders of our home didn't do us the favor of preparing the drywall before they installed the wallpaper. Which they didn't.
Mr. Great Indoors had just about finished repairing the drywall on the back wall of the guest bathroom last week, so it was my turn to tackle the wallpaper. I took a deep breath and dove in, and I figured I'd share what I learned in the process. I've said it already, but remember we were working in a room where the drywall wasn't prepped before the wallpaper was hung, so those of you lucky enough to have prepared drywall probably won't have to go through the mess we did. I didn't keep very good track of time doing this project, but it took me three evenings after work to get this done at probably 2-3 hours per session. So go ahead and count on a full day's work to remove all the wallpaper in a small room. Oh, and these are not pretty pictures (even the "after" photos), so go ahead and prepare yourself for that.
Mr. Great Indoors had just about finished repairing the drywall on the back wall of the guest bathroom last week, so it was my turn to tackle the wallpaper. I took a deep breath and dove in, and I figured I'd share what I learned in the process. I've said it already, but remember we were working in a room where the drywall wasn't prepped before the wallpaper was hung, so those of you lucky enough to have prepared drywall probably won't have to go through the mess we did. I didn't keep very good track of time doing this project, but it took me three evenings after work to get this done at probably 2-3 hours per session. So go ahead and count on a full day's work to remove all the wallpaper in a small room. Oh, and these are not pretty pictures (even the "after" photos), so go ahead and prepare yourself for that.
Sunday, February 12, 2012
Our Reclaimed Barnwood Table

So for Christmas, Mr. Great Indoors built me my very own beautiful table. Of course, I took plenty of pictures through the process and thought I'd share them in two separate posts: one dedicated to the building of our beautiful table and one just for all the tasty pictures. Mmmmm.
I'm choosing not to call this one a "do it yourself" project because we had specialized furniture equipment at our disposal. Mr. GI's family owns a furniture store, and they also have a shop full of equipment for manufacturing their own pieces. They were kind enough to let us use their lumber and tools for a few days. You could certainly do a good portion with your own sander, table saw, etc., but it would probably take longer than the three days Mr. GI took to build ours.
Friday, November 4, 2011
DIY Week: The Goldilocks Bags
I'm sure you all have at least one camp chair. And I'm sure each of those camp chairs has a POS bag that ripped the first time you put the chair back in it. Here's how ours looked at the beginning of this project, including one huge rip at the bottom of one of the bags.


Thursday, November 3, 2011
DIY Week: Fall Bunting
I was itching to make something festive that would last the entire fall season. I've seen so many fun buntings around the interwebs recently. The one that got my attention first, of course, was from Young House Love's bunting for Clara's first birthday. (Hilarious post title, by the way, and one of my favorite "okay, we're human, too" posts from YHL.)

My only stipulation for this craft was that I couldn't spend a dime on it. I knew I wanted it to be fall-colored, so I set out in search of fall colored fabrics already in the house. I ended up with a t-shirt of mine (purple), two old t-shirts of Mr. Great Indoor's (tan and orange), and a few pieces of fabric my mom gave me a while ago (red and yellow). And the strip at the top was canvas used for the camp bags I'm posting about tomorrow. Forgive the flash, but it was the only way to capture the true-to-life colors of the fabrics.

Wednesday, November 2, 2011
DIY Week and Pinterest Challenge: Paint Chip Art

If you're stopping by from Bower Power or Young House Love, welcome! Take a look around The Great Indoors. We're in the midst of DIY week!
It's that time again! Thanks to Katie and Sherry, this season's Pinterest Challenge kicked me into gear and got me to finally publish all of my DIY week posts (some of those projects have been in the hopper for a while... oops). If you still haven't heard of Pinterest, here's my last Pinterest Challenge post to fill you in. Follow me with that cute red button at the top of the page! (Or just click here, although the button is more fun...)
This time around, I decided to finally do something about the paint chip ideas I'd had stirring in my head. (No pun intended...) I've included both the original source and my pins for each of the ideas I considered, just in case you want to do some research and/or pinning of your own!
Tuesday, November 1, 2011
DIY Week: A (Basically) Free Wine Rack
Mr. Great Indoors built us a wine rack within a month of moving into the house. He didn't have a lot of tools at that point, so he didn't build it to be very complicated. Here's a picture of the old rack from the day of our housewarming party a few years ago. Boy, don't things look different! Unpainted cabinets, old sliding glass door, old dishwasher... we don't really miss any of those things these days.

Monday, October 31, 2011
DIY Week: Spookifying Our House
I don't go all out for Halloween, mostly because I'd rather decorate for a season rather than one day. But I wanted to introduce a little of the day into our house. So I let out some bats in our living room.
First I grabbed some black construction paper and white chalk. I got some rough inspiration from Google images and sketched away.

DIY Week!
I've had a few craft projects up my sleeve that I haven't had time to blog about, so I thought I'd post about all of them this week! Hold on to your horses, folks!
Monday: Spookifying Our House

Tuesday: A (Basically) Free Wine Rack

Wednesday: Pinterest Challenge: Paint Chip Art

Thursday: Fall Bunting

Friday: The Goldilocks Camp Chair Bags

So stick around for all the fun this week!
Tuesday, October 25, 2011
The Making of a Bookcase
Our dining room bookcase had gotten overrun with things, stuffed with books and odds and ends (some decorative, others just junk). It was time for a makeover. I didn't take a true before picture, but here's some of the stuff that came out of the bookcase. There was more on the floor and in the chairs. What a mess.

Tuesday, October 18, 2011
Correcting the French Mistake
If you understand the title of this post, you either know me really well or you (like me) have seen Blazing Saddles a million times. Or both.
This is the continued story of our &!@#$% patio door. I wrote about our latest mishap here. About two weeks after we ordered it, our glass arrived at Home Depot. So Mr. Great Indoors and our handy friend, who you'll recognize from our last door installment, took some time out of their Sunday to install it. (P.S. Thanks to my friend H for taking pictures of this process while I was at work over the weekend!)


Thursday, September 22, 2011
DIY Plastic Bag Organizers
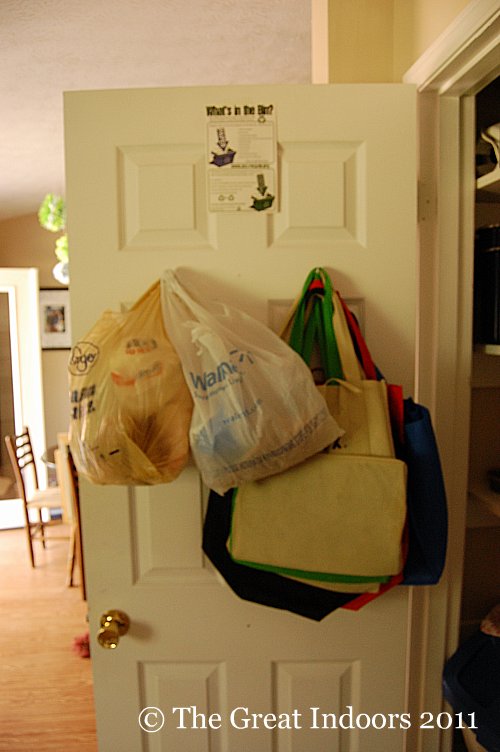
As you saw in my last post about organizing the skeletons in our closets, I DIY'd plastic bag organizers to hold all of our plastic grocery bags. Here's a refresher of what that grocery bag situation looked like before. Yuck.
Tuesday, September 20, 2011
Skeletons in our Closets
I had gotten sick of our closets being disheveled; I felt like I was being ambushed every time I opened our pantry door. We had a few problems to tackle:
- The cleaning supplies (mop, broom, vacuum) had been in the Man Cave closet since we moved in and didn't quite fit there anymore (well, actually ever). I tried to move them to our pantry, but they fell over every time I opened the door.
- Our collection of plastic and reusable shopping bags made it difficult to close our pantry door.
- Our tailgating supplies, which stay in the shed in the off-season, needed to be easily accessible for football season.
I started with the pantry, since it was the most offensive of the closets. Here's how it looked to start. There's the mop and broom that made an appearance every time the door was open.

Tuesday, September 6, 2011
Preparing for Emergencies
In honor of National Preparedness Month and after the past few weeks of tropical storms, hurricanes, and earthquakes on the east coast, I thought it was an appropriate time to talk a little bit about how you can prepare for a weather disaster in your own house. Part of my full-time job is emergency preparedness (I'm responsible for creating the emergency plans in our buildings and for carrying out those plans in the event of an emergency), but I am by no means an expert (check out NOAA, Ready.gov, the American Red Cross, or The Weather Channel for comprehensive information). Here are some of the things I've learned about preparing for severe weather.

Image here
Tuesday, August 30, 2011
The Great Door Project of 2011: Part 2
Come to think it of, this isn't part two-- it's more like part four. First we changed the locks on the front and side doors, then a pesky piece of pea gravel shattered our sliding glass door and we replaced it with a French door, then I painted the jambs, but that wasn't good enough so now we're on to the painting of the front and side doors. Whew!
When I last left you, I had been pondering a paint color for the doors. I decided on Fabulous Red (Valspar 1011-2), partially because it looked so good with our orangey-reddish brick, but also because Mr. Great Indoors put his vote in for that color and I couldn't help but agree. And come on-- it's Faaaaaaabulous.

When I last left you, I had been pondering a paint color for the doors. I decided on Fabulous Red (Valspar 1011-2), partially because it looked so good with our orangey-reddish brick, but also because Mr. Great Indoors put his vote in for that color and I couldn't help but agree. And come on-- it's Faaaaaaabulous.

Subscribe to:
Posts (Atom)