If you're coming over from Young House Love, Bower Power, or Hi
Sugarplum, welcome! Take a look around The Great Indoors. I'd suggest
starting by taking the House Tour or looking at the Project Archives.

I seriously did a big ol' happy dance when I got an invitation from Katie last week to participate in the winter edition of the Pinterest Challenge. I started reading Young House Love back when it was This Young House about three years ago now, and then got caught up in the bacon-stravaganza at Bower Power not too much later. So it kind of feels like these girls are family! And I'm glad to get to know Cassie at Hi Sugarplum, too!

When I got on board with this challenge, I considered several different pins, like this fun stickered canvas inspired by Kate Spade, or a super easy pillow cover, or even starting in on my guest bathroom remake with a printed (shower) curtain. But the one that really got me was this Mason jar chandelier on Style Me Pretty (see the pinned page here and the original post here with lots more inspiration; photography by Tanja Lippert Photography).

I'd already drooled over a ton of chandeliers similar to this one, like this pillar candle chandy from Restoration Hardware that's just a tad out of our budget. Go ahead and click on that link to see just how out of budget it is for you. Whew.

At any rate, the Mason jar chandelier was inspiring and much more affordable, so I decided we should just go for it. I should say at the outset that Mr. Great Indoors is my hero. He makes all my dreams come true, the least of which was this week's Pinterest Challenge. Without him, I couldn't have done any of this. Primarily because I'm scared of power tools (I keep thinking I'll end up like that guy in Monty Python with both his arms chopped off) and because I tend to overthink everything. So this post is dedicated to Mr. GI, my hero.
Buy supplies
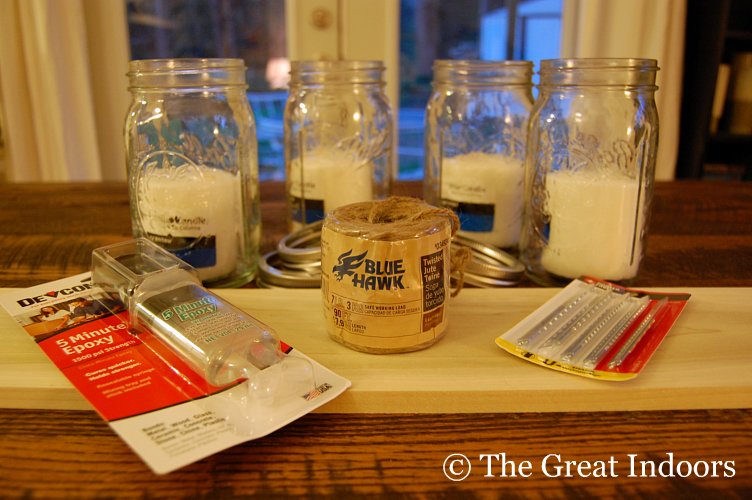
- Wood: 1/2" x 6" x 4'
- I had planned to use a piece of wood we already had (i.e., a pallet I thrifted from work), but that didn't work out... so we bought a brand new piece.
- 4 wide mouth Mason jars with rims
- If we hadn't been able to find jar rims, we thought about gluing the jars directly to the wood. But the benefit of gluing in the rims is that we can easily take the jars out for cleaning or to replace the candles.
- 4 candles (mine were about 3" tall and 3" wide)
- Twine (we used 7 lb weight jute twine)
- 5-Minute Epoxy
- Jig saw and jig saw blades (or a hole saw if you have the right size; we didn't)
- Spray paint
- Dry wall anchors
Measure and cut
Measure the correct spacing for your mason jars. Since the board we used was 48" long, it evenly divided into four 12" lengths. So each rim was centered at 6", 18", 30" and 42". Mr. GI used his square to draw a straight line across the board at each of those measurements. Then he marked the halfway point on each line to notate the center of each jar.

Using the cross for reference, Mr. GI eye-balled the rim in place and traced around it. He tried tracing a different way-- by drilling a lid into the board to hold the rim down. But that seemed to be over-thinking things a bit, so went to eye-balling instead.

He went ahead and marked the locations where the twine would hang the chandelier from the ceiling. We decided on six points to provide plenty of support.

Mr. GI drilled out the holes for the twine, then pre-drilled two holes where the straight line met the circle. That way we'd have a starting place and guide for the jig saw. Of course, if you're using a circle cutter there's no need for this step.

Using the pre-drilled holes, he cut out one-half of the circle at a time. After the first circular cut, we tested a rim to make sure it fit. Then Mr. GI cut out the other three circles and we tried all four holes with rims and jars.


Paint!
Obviously, if you have a reclaimed or recycled piece of wood, you can skip this step. But since we were using brand-new wood and I wanted a "time-worn patina" to match our new (old) table, I went for white spray paint that I would then slightly distress with sandpaper. Prior to the first coat of primer and between each coat, I sanded lightly with a 220-grit sandpaper. I didn't have any pictures of the spraypainting process, but keep in mind you should spray side-to-side in fluid motion about 8-10 inches from the surface. And so what if we spray paint using our clothesline. As if this post couldn't get country enough (Mason jar chandelier? We're not kidding anyone). We used an extra bungee cord to suspend the wood for easy painting.

After the spray paint had time to cure overnight, I gave it a light sanding on the edges to make it look worn. Then it was time to glue in the jar rims. We used a 5-minute epoxy that takes (you guessed it) five minutes to set, but an hour to cure. We ended up giving it two hours of cure time. The epoxy is made of two parts, one hardener and one part resin that you mix together to form a strong epoxy. Then we just slapped it on the rim (you could just as easily spread the epoxy on the cut hole and then place the rim) and fit the rim right in. You can double check the jar sits evenly, and if you want to get really

Hang!!
Mr. GI climbed on top of our quite sturdy dining room table with his laser level to make sure we were hanging the chandelier correctly. (More details about building and loving our table here and here.) Using the laser line, he placed three drywall anchors and eye screws in the sloped dining room ceiling.

We eyeballed the distance from the table to the chandelier height, which ended up being 28" from the table and 44" from the ceiling. We multiplied the ceiling length by two since we were using three lengths of twine for each of the three supports, and added an extra 12" just in case for a total of 100" for each length of twine. We went ahead and added in the candles and rice to the bottom of each jar (the rice should stabilize the candles, although you could use sand, too) and threaded each of the three lengths of twine.

We hung the middle twine support first, then added in each side making sure the chandelier was level. I think it was a small miracle at this point that everything leveled out.

Miracle or no miracle, we lit the candles and stepped back to admire our project. I have to say, Mr. GI and I were both pretty nervous about this project. It might be that I felt a tiiiiiiiny bit of pressure being amongst such awesome bloggers for the Pinterest Challenge.... or you know, maybe that I thought I'd chop off an arm in the process or burn our house down. Whatever.


After letting the candles burn for about an hour, the only slight heat we noticed was around the jar mouth just underneath the wood, but it's not nearly enough to cause any problems. In general, the heat seems to head straight out the jar openings, so we think it's plenty safe as long as the candles are monitored. Also, it might come in handy that I just learned (from Pinterest, of course) that I can either freeze or bake my Mason jars to remove old wax. Someday I'd like to have a legitimate light fixture here, but in the meantime we're going to enjoy the dickens out of this redneck chandelier!
The project broke down like this:
- Poplar (1/2 X 6 X 48) $7
- Jig saw blades $7
- Twine $2
- 5-Minute Epoxy $4
- Spray paint $2 (I bought the cheap stuff since I knew I would be sanding it down)
- Canning caps $4
- Small pillar candles $8 for 4
- Drywall anchors $5
- Total = $39
Pssst... want to see how the chandelier is holding up? I wrote about it here.
Don't forget to check out the other hosts' fabulous projects here:
Katie's Watercoloring at Bower Power
Sherry and John's bean bag at Young House Love
Cassie's DIY Faux Antlers at Hi Sugarplum
NOW. We want to see your projects! If you decide to share your own project, I've included the link tool at the bottom. Just make sure that in your own blog post you link back to all four of the hosts: me, Katie, Sherry, and Cassie. And you can even put the banner in your post, too, to make it really legit. Here's how you link up:
- Click on the blue "Add Your Link" button at the bottom of the post.
- Add a link to your project blog post in the url field (directly to your post, not your home page, please)
- For "name," write a short descriptive name for your project, like Redneck Chandelier. Just checking to see if you're still paying attention. :-)
- And another friendly reminder, please remember to link in the body of your post to the pin and the original source of the photo on Pinterest, plus back to me and the other hosts of the Pinterest Party.

P.S. Congrats to Katie for her great baby and Homie news last week!!
Great project, Erin!!! It looks perfect over your table!
ReplyDeleteLove this!! I have this pinned and want to make one of these for our wedding- thanks for the tutorial!
ReplyDeleteI'd love to see pictures if you end up doing these for your wedding! Good luck!
DeleteThis is really lovely! What a fun project!
ReplyDeleteWhat a beautiful light fixture! I'd love it for our wedding, too, haha. Is it hard to light all the candles? They look like they're a bit out of reach.
ReplyDeleteNope, it's not too hard. We used a grill lighter that has a long neck, and stood on a chair to light the candles.
DeleteWell done, Erin! Simple and beautiful. Thanks for hosting along with the others. Can't wait to check out all of the projects!
ReplyDeleteThat is really cool and you have a nice husband!
ReplyDeleteThat looks beautiful!! Very romantic. Thanks for hosting!
ReplyDeleteHi Erin,
ReplyDeleteYour DIY chandelier looks amazing! Mason jars. Another one of my favourite things! I also spied your previous challenge entry sneaking into one of your shots :)
Thank you so much for co-organizing this challenge! I had lots of fun participating.
I have linked up above but you can see view my project at http://alittlesomethinginthemeantime.blogspot.com/2012/03/pinterest-winter-challenge-vintage-look.html
Have a great day!
Claire
Haha-- you've got a good eye! I did that on purpose. :-) Can't wait to see your project!
DeleteThis looks great. I know my friend will love this for her house! Going to send it to her now :)
ReplyDeleteThat makes for a really nice lighting effect. Does the wood get hot at all over time?
ReplyDeleteI had the candles lit for about an hour, and the only heat I noticed was the lower bit of of the mouth, right under the rim. If you're concerned about the heat, they make all sorts of battery-operated candles these days, so you could easily swap those in.
DeleteI've never been to your blog before, but I think that's going to need to change! I absolutely LOVE this fixture and feel pretty inspired!
ReplyDeletewow that looks great! I have a similar pin on my DIY board.. need to get on it!
ReplyDeletexx
That is gorgeous! Nice job (and thanks for hosting!)
ReplyDelete~Elena
Thanks so much for hosting such a FUN party!! It's always good for a little push to finally follow through on one of those PINNED projects :o)
ReplyDeleteYour Mason jar chandelier looks FAB-u-lous! The glow from the candles is perfect for a romantic dinner for two :-)
ReplyDeleteI'm so with you on the hubby thing - mine is my go-to guy for all things power tool & math related :-) We actually did a similar project recently (a bubble light fixture), and hubby came in REALLY handy! He has way more patience than me, and can figure out all the measurements and technical stuff :-)
Kelly
They're pretty nice to keep around, huh? ;-)
DeleteThose are beautiful!! Great job. Congrats on the party!
ReplyDeleteWhat a great way to add a light fixture with no electrical. I love the candlelight - so pretty! Looks so great over your table too - and I think it's even better than the RH fixture.
ReplyDeleteOoh, thanks, Carmel! One of my friends did the math and figured out that we paid 3% of the cost of the RH fixture. Pretty good feeling. :-)
DeleteErin this looks so awesome! I can't wait to see it in person :)
ReplyDeleteI love this!!!!!
ReplyDeleteI love this!! Looks great! So fun and easy and beautiful!
ReplyDeleteGood Job!
Newest follower! :)
Great job! I love this idea and your how-to is fantastic! Thanks for sharing! =)
ReplyDeleteOh wow, this is so pretty! I love anything with a mason jar! You did an amazing job! Thanks for hosting!
ReplyDeleteHi Erin,
ReplyDeleteThis is a great project, what a creative use of the jars and I bet it would be fantastic outside as well.
Thanks for hosting the party!
It turned out so gorgeous! Beautiful job!
ReplyDeleteThanks for hosting! I always love to see a great mason jar project... off to Pin It right now!
ReplyDeleteThat looks so cool and you made it look so easy to make!! Love it!
ReplyDeleteLOVE THIS!! Almost as much as I love my new Tin Can Man yard art...haha, okay I probably love this more. :)
ReplyDeleteI am so excited to see this!! We just pinned this at our house the other day!! Now I am FOR SURE going to make it! Great job!!!!!
ReplyDeleteThat is seriously amazing lighting!
ReplyDelete-caroline @ c.w.frosting
Amazing! Simply gorgeous! I wish I owned my own home so I could hang one of these up. Great job! :)
ReplyDeleteHey Erin, Your DIY chandelier looks amazing and fabulous. It's a lovely creation you have shared. I have also tried this in my home and got a wonderful result to make it. You have done such a wonderful job!
ReplyDeleteVery cute! You could also use battery operated candles. Target has some pretty ones!
ReplyDeleteI REALLY like this. Like... wow!
ReplyDeleteGreat idea! I have decided to pass on the Liebster Blog Award to... you! Please check your email for the details. :)
ReplyDeleteThis looks awesome! Great job. I wish my fiance had tools and knew how to make things so he could help me make cool stuff too :)
ReplyDeleteIt's been a learning process for both of us the last few years, that's for sure! Just figure out the basics and from there you'll get the confidence for bigger projects. :-)
DeleteThank you for being a wonderful co-host of the Pinterest Challenge, and for your comment on my own attempt to play in the big leagues. Your P.S. made me smile - I did a double-take when I pulled up your blog for the first time, too. Glad to know I'm not the only one who appreciates a lovely dandelion silhouette every now and then!
ReplyDeleteLove this, it looks brilliant!
ReplyDelete