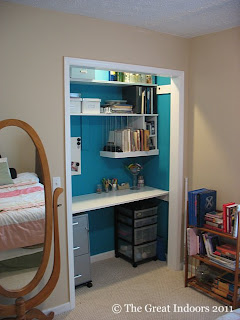
My favorite part of the guest bedroom and probably my favorite DIY to date is the closet office Mr. GI and I rigged up about a year ago. I wanted a place for my crafting supplies and other random stuff, and I loved all the office closets I’d seen around the blogosphere. So with Mr. GI’s help, we made it happen!
Here it is before. What a mess! I had already yanked down the bifold doors to the closet. Personal vendetta? Maybe.
Here it is before. What a mess! I had already yanked down the bifold doors to the closet. Personal vendetta? Maybe.
My first step was to pick a color. I had been itching to paint something with a saturated color, but I didn’t want to paint a whole room. I picked out the deepest teal in a Chevy ad and matched it to some paint swatches I grabbed from Lowe’s. The match ended up being Valspar’s Cool Rain (Lowe’s, 5005-10). Perfect!
Next step was for Mr. Great Indoors to patch all the random holes in the closet drywall and build a vertical storage system for my paper. I took a page out of Benita’s book and asked for vertical storage similar to hers. Mr. GI then took that idea and ran with it, building a shelf with 40 feet of steel cable wound around in vertical columns. Perfect for storing my paper. We ended up taking out the middle shelf (since it was too tall/shallow for the grand plan) and replaced it with a piece of oak left over from a previous project.
Mr. GI and I have a deal that he builds and I paint, so after he finished up the handy storage I slapped paint up on the walls and painted the shelves. I only bought a quart (didn’t really want to end up with a whole gallon of the stuff since I only planned to use it in one closet), and I used just about every bit of it. We probably have about a tablespoon left for touch ups.
Then I filled it with my stuff, and ta da! Isn’t it so happy?
Update: here's the link to the full ad
Next step was for Mr. Great Indoors to patch all the random holes in the closet drywall and build a vertical storage system for my paper. I took a page out of Benita’s book and asked for vertical storage similar to hers. Mr. GI then took that idea and ran with it, building a shelf with 40 feet of steel cable wound around in vertical columns. Perfect for storing my paper. We ended up taking out the middle shelf (since it was too tall/shallow for the grand plan) and replaced it with a piece of oak left over from a previous project.
Mr. GI and I have a deal that he builds and I paint, so after he finished up the handy storage I slapped paint up on the walls and painted the shelves. I only bought a quart (didn’t really want to end up with a whole gallon of the stuff since I only planned to use it in one closet), and I used just about every bit of it. We probably have about a tablespoon left for touch ups.
Then I filled it with my stuff, and ta da! Isn’t it so happy?
Once everything was said and done, it took about four days for this project, working through the week. I bet that we could have done it in a weekend if we’d wanted to. As far as the cost, I’ll have to give an educated guess (since I wasn’t writing a blog a year+ ago and I’m too lazy to scrounge up the receipts). We spent $13 on the paint and about $24 on the steel cable, so about $40 total. Not bad for a completely refurbed closet!


I absolutely love this closet! The color is GORGEOUS.
ReplyDeleteThis is an awesome idea. I might do something similar to the closet in my craft room.
ReplyDeleteI still love it! It does limit the size of your project, so the only thing I would do differently is to have my hubby install an expandable desk.
Delete